Saturday, August 24, 2013

We are finally making some progress!!

So I know it's been awhile since I posted but summer got crazy and some of my family came to stay with us for a month and all projects were put on the back burner. One project that did get done though, was our guest room....it was just studs...now it is sheet rocked, mudded, taped, textured and painted!!! It is awesome! We have been trying to get it done for 2 1/2 years. I have my dad to thank though since while he was staying with us he completely did the room! Thanks dad!!!!

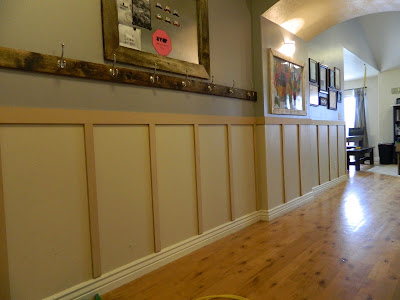
The purpose of this post though is to update you on the progress of the board and batten. I am proud to say we have finally gotten around to putting it up!!


 It still isn't done...but all the boards are cut and ready to be installed. YAY!! Seeing as how my kids were less than helpful with this project and they couldn't (or rather wouldn't) even focus on keeping my 2 toddlers and the baby happy it took longer than we planned. We had to take care of the young kids and that meant lots of breaks. Here are the pictures of what we were able to do today. Tomorrow we plan on finishing the installing and caulking all the seams. Next weekend we will finish the living room and paint everything!!! I am so excited that this is so close to being done!! I forgot to take during pictures this time around, so tomorrow I will try to remember to take the during ones and perhaps I will post a tutorial. Enjoy!


This is the side of the hallway we need to finish. Hopefully it will be done tomorrow. 


If you have questions just ask!!

Friday, June 28, 2013

Homeschooling, Curriculum and Schedules

Since we just started our year of homeschooling and I just finished buying all our curriculum for this year I thought I should write about it. Every year I have used material that I have found for free, dirt cheap, or was gifted to me. Every year my kids get burnt out about halfway through because they don't really love the curriculum that we are using. This year I decided to totally revamp what we use and I bit the bullet and bought some curriculum that was NOT cheap. Shhh!!! Don't tell my husband! I am sure he will see the bill and ask me later...but until then....

I thought I would share what our homeschool center looks like. This is where we store the basics for daily use. It is super messy right now, but I figure that if I cleaned it up and then took a picture you might think that  it was always clean! Actually it looks like this a lot of the time. 


So, for the first time ever I actually sat down and mapped out a full year for each of my kids. Maybe it's because my oldest is in 7th grade this year, or maybe it's because I realized I just needed a bit more organization than I have had in the past. Actually it was because I finally bought the book A Well Trained Mind and it made such sense that I implemented a lot of her ideas. I was already doing some of them, but she made it so much easier for me to plan and get precise about what I wanted. I highly recommend this book for all homeschooling parents out there. 

Here is a picture of our June schedule. I got this printout from Donnayoung.org


I did not put every subject on here because I didn't think there was a need. The subjects that they do on their own without help, and the subjects they do daily are NOT listed on this. I use the weekly schedule below to list everything. I found it at fivejs.com. (I just checked and her website was down. Hopefully it will go back up!) It's back up! She has some really cool stuff on her website. You should go check it out!


This is my daughters weekly assignment sheet. I list the subjects and how much of each subject my kids are supposed to do every day. As they do them, they check them off. I grade everything at the end of the week. I used to grade every day but it became to time consuming. 

This is a list of everything we are using this year. I figure it's easier to make a list rather than explain why or how we are using each thing. That way if you don't want to read this whole post you don't have to. :) If you want to know what we have used other years or how I like what we are currently using, just ask!

Math: Math-U-See (MUS)
History: Story of the World (SOTW) and A History of US
Science: Simple Schooling, living books with notebooking, and Netflix
Writing: Wordsmith Apprentice for my oldest 2, and Writing Strands for my 8 and 9 yo
Foreign Language: Prima Latina for Latin
Art: Drawing with Children and McGraw Hills Art Connections
Grammar: Easy Grammar
Spelling: Spelling Power
Logic: Mind Benders
Reading: Whatever the book is for LLATL or personal reading 
Learning to read: McGuffey readers and the app that goes along with it
Scriptures: reading and activity sheets
Keyboarding: We use this fun BBC website but may switch to this one.

Next semester my oldest will be using this site to learn programming, and this site for foreign language.

Any questions?? I was so enthusiastic that I have already planned NEXT year too....and part of the following year. 

Monday, June 3, 2013

Maps and Frames

Since I homeschool and I LOVE maps, I always have to have them hanging up somewhere in the house. The only problem with that is I can never find a frame that fits them. I don't know why I never thought of just making my own, duh! I have made so many other things these should be a walk in the park. With my new walls being gray I wasn't sure what color I wanted them so I didn't decide right away. I got out the chop saw and the scraps of wood in the garage and I measured the maps and then I cut the wood at 45 degree angles so they would fit together nicely.


Painted and put together.

I used the nail gun to secure them together, but they aren't very sturdy so I didn't want to move them very much. Then I decided that I wanted to paint them white. I don't have ANYTHING else in my house that is white, and I thought it would go nicely with the gray walls. Btw...it was hotter than #@*% the day I decided to do this and I was sweating like a pig. After it was painted and put together I took it inside and hung it on my wall over the maps. It looked...weird. I left it there for a few days deciding what to do with it and why I didn't just love it. Then I realized it's because I don't have ANYTHING white in my house and it just didn't fit in with the other decor.


Painted and sanded down.


 So, I took it outside and sanded the crap out of it until I thought it looked rusitc and old enough that I was happy. The corners of one of the frames had knots close to them and when I started sanding them, they broke off. I loved the look of the missing corners! It made it that much more rustic looking. Then I got my walnut colored stain and I carefully wiped the stain onto the exposed raw wood. I quickly wiped it off the paint because I didn't want to get it on the paint just yet. After I had stained the wood (yes I techinically did the paint/stain/sanding thing a bit backwards from how you really should antique things...but who is judging?) I took the rag I had used for the stain and I ran it over the paint gently until I thought it looked antiqued and rustic.


All rustic and awesome


Check out the awesome broken corners!


Love the old feeling this gives.

 I am SOOOOOOOOOOO Much happier with this look rather than the stark white frame. I guess for now I will not be going with any more plain white furniture or decor. To hang it I just screwed this into the wall with 4 LARGE screws that I found laying around my house. My hubby said they were overkill. I said, " At least it will stay on the wall!". Of course he just ignored me. He knows I do what I want, even if it is overkill. That is why I love him though. He lets me be crazy and do all my projects without really batting an eye. Although he does roll his eyes at me from time to time. 

In the mood for change...and it's driving my hubby insane!

I tend to get crafty in spurts. It's not always a good thing either. Like when I tell my hubby that I have all these great ideas and I list them out and there are like a bajillion of them...he usually rolls his eyes and tells me to pick one.

Well, I picked one. I wanted to add board and batten to my walls in my hallway and living room. Here's the not so great part...I finished 1/3 of it and then I moved on to a different project. However, it is not my fault I didn't finish it!! You see, I have 3 large MDF boards in my garage that need cut into the boards and batten. Since these boards are so large I need help with the lifting and holding. My hubby (who thinks my idea is ridiculous and doesn't even want board and batten) agreed to help me. He wasn't even reluctant to help...I think he secretly likes all my ideas because it gives him an excuse to use power tools. Don't tell him I am on to him though or he might stop helping me! So, back to why I am not done yet...he got severe seasonal allergies and has been super miserable. He has tried every otc medicine and every prescription and NOTHING works for him. So he just has to be miserable for a few weeks. :( So until his allergies get better I have to wait to get my boards cut. BUT you can see my beautiful progress so far!

This is my hallway from my front door to the main living area. The walls were an oatmeal color that was ok, but not really my style. The tape on the walls was a guide as to where I want the board and batten to go. I actually had the height 5 inches higher and I left it like that for 2 days to see if I liked the height before I painted anything. Turns out I didn't like the height I thought I would, so I lowers it. Currently it is sitting at 38 inches off the floor. I initially spaced the boards 24 inches apart but I didn't like that either, I finally settled on 18 inches apart.

Here you can see the chair is near my front door and I had already started to paint. Look on the shelf in the bottom left corner....see my new AWESOME laser level!!! I told hubby I needed one and he gave in and let me get it! It. Is. Awesome.

Here it is with the top part of the wall done. I LOVE, LOVE, LOVE the gray color! I got it at Lowe's and it is called Flagstone. I got it in their Olympic ONE Satin because, well, I have kids. Lot's of them and I wanted something durable and washable. I tried it in our office first and I didn't get it in the Olympic ONE, I got it in their cheaper stuff and it is CRAP! I tried washing the walls and the paint came right off. So far, I have been able to wash the walls that I used the Olympic ONE on and it really is washable! I am one happy mommy!
This hallway is done!

And so is this one! 

I will have to post pictures later when it is all done and decorated! I can't wait to finish it! JSYK, I did ask Lowe's to cut the MDF for me and they wouldn't do it because they have a policy of no cuts under 6 inches. I begged and pleaded....it didn't work. So, I will wait as patient as I can for the next few weeks. It won't be that hard....remember I have a HUGE list of projects! In fact I have one I need to post about and one more I am finishing up tomorrow. I just need to start remembering to take a before picture of all my projects!

I do realize these pictures are horrible and don't do it justice. When I am done with the final project I PROMISE the pictures will be better!


Wednesday, May 1, 2013

Super Yummy Curry Rice Stir Fry


Years ago I lived by a friend that could turn any ingredients into something that tasted like heaven.  She was an amazing cook, or as I like to call her, a chef. While I was growing up, I ate a lot of homemade meals, but  I didn't experience a lot of diversity in foods unless we got Chinese take-out, which was rare. So, having a palate that was used to american foods I really began to enjoy eating foods from other cultures. This is one of my friends recipes that I fell in love with. It is quick, easy, cheap, and GOOD!

Lori's Curry Rice Stir Fry

3 cups of cooked rice (cook and let cool. I usually cook it in the morning)
3 large Chicken breast cut into strips or cubes
2 TBS olive oil
2 TBS yellow Curry (you can adjust this to the level of spiciness you want. I generally put more if my kids aren't going to be eating it, and less if they are.)
1 tsp Chinese 5 spice
1 chopped onion. NOT diced small. You will want bigger chunks.
1/4 - 1/2 Cup raisins, or however much you want
1/4 - 1/2 cup peanuts
1/2 can pineapple tidbits, drained
1 tomato, sliced into chunks
1 package Fresh Basil (remove the stems so you just have the leaves)


1. Cook over medium heat in a skillet the chicken in the olive oil until it is no longer pink on the outside. Add the curry and Chinese 5 spice. Cook until chicken is done.
2. Add onion and cook for 2-3 minutes until it starts to soften. Add the raisins and peanuts. Cook for 2-3 more minutes or until the raisins are beginning to plump.
3. Add the rice. Stir all together until the rice is coated with the curry and Chinese 5 spice.
4. Add the pineapple, tomato and basil leaves. Stir together and let cook for 2-3 minutes. Enjoy!


P.S. The curry rice in the picture doesn't have raisins in to because my kids ate them all and I forgot to buy some. It was still good without them!

Tuesday, April 30, 2013

My new front porch!!

I finally got around to doing a project I have been waiting years to do! We moved into our house several years ago and from the moment I saw the front porch I hated it. I knew that eventually I would change it out, but life happened and now it has been years. I guess though it is better late than never! This is the before picture of what it looked like. Pretty plain and ugly isn't it! That is not one of the prettiest browns I have ever seen. It really made the porch feel tiny, dark and closed off.


It took me about 8 hours on a Saturday to paint everything. I had to do 2 coats of paint on the walls to cover the brown. Initially I was going to paint the door black just like the trim around it, but my husband said no. So, off I ran to the paint store to look for a color that would go well, and he would like. I came back with about 20 different choices and he picked this beautiful gray/blue! I LOVE it!! I am so glad now that I didn't go with black!


After redoing everything on Saturday my husband thought I was done. I guess he was hoping I was done. Anyone who knows me knows I probably wasn't done. Hehehehe! So, yesterday I pulled out the wood I had bought a few weeks ago and I cut, sanded, stained and built myself a screen door!! I have been wanting one FOREVER and I figured now was a great time to build one. I did look at buying one, but either I couldn't find what I wanted, or what I wanted was too much money. So, for about $45 I built one. I still haven't put a latch in. I am debating either adding a hook or a magnetic latch. I do need something though....and soon!

So, there you have it! My new front porch. I just love, LOVE, LOVE it!!

Tuesday, April 2, 2013

Yummy simple dinner

Last night I was not in the mood to make dinner, plus I forgot to pull meat out to thaw the night before so I had to come up with something quick AND easy. I riffled through my freezer to see what I could find and then I went to my pantry. I found frozen chicken tenderloins, artichoke hearts in a jar, fresh asparagus and garlic. So I turned my stove on to med-low and started to heat up the pan. Then I thawed my chicken (about 4 pounds) on the counter for about 15 minutes until the ice started to melt. Once it was mostly melted I placed it in the pan and cooked it for about 3 minutes per side. I added the whole Costco sized jar of artichoke hearts with the oil to the pan and then I let it cook for 15ish minutes stirring occasionally  In another pan I melted 3 Tbs of butter and then added about 3 cloves of garlic. I let it simmer for a few minutes then I added the whole Costco sized bag of asparagus and covered it with a lid. I let it cook for about 10 minutes until it was soft. My kids and husband LOVED it! They ate it all up and asked for more. I usually don't get a response like that so I know this is a winner. Sorry I don't have any pictures this time...by the time I realized I should blog about this it was all gobbled up. I guess I could have taken a picture of the empty plates but my kids did the dishes so fast that wasn't really a possibility either. Next time.